> ## Documentation Index
> Fetch the complete documentation index at: https://cerebrium.ai/docs/llms.txt
> Use this file to discover all available pages before exploring further.
# Managing Files
Cerebrium offers file management through a 50GB persistent volume that's available to all apps in a project. This storage mounts at `/persistent-storage` and helps store model weights and files efficiently across deployments.
The `/persistent-storage` directory is not directly accessible during build
time. Use the Cerebrium CLI commands or the mounted volume at runtime to
manage these files.
## Including Files in Deployments
The `cerebrium.toml` configuration file controls which files become part of the app:
```toml theme={null}
[cerebrium.deployment]
include = [
"src/*.py", # Python files in src.
"config/*.json", # JSON files in config.
"requirements.txt" # Specific files.
]
exclude = [
"tests/*", # Skip test files.
"*.log" # Skip log files.
]
```
Files included in deployments must be under 2GB each, with deployments working best for files under 1GB. Larger files should use persistent storage instead.
## Managing Persistent Storage
The CLI provides four commands for working with persistent storage.
At runtime, the volume is mounted at `/persistent-storage`. When using these
commands, the Cerebrium CLI does not display the `/persistent-storage/`
portion of the path.
Each region has its own isolated persistent storage volume. File commands operate on the default region set by `cerebrium region set` (`us-east-1` for new accounts). To target a different region for a single command, pass `--region` (or `-r`):
```bash theme={null}
cerebrium ls --region eu-north-1
cerebrium cp model.bin -r eu-north-1
```
1. Upload files with `cerebrium cp`:
```bash theme={null}
# Upload to root directory
cerebrium cp src_file_name.txt
# Upload to specific location
cerebrium cp src_file_name.txt dest_file_name.txt
# Upload to directory
cerebrium cp dir_name sub_folder/
```
2. List files with `cerebrium ls`:
```bash theme={null}
# List root contents
cerebrium ls
# List specific folder
cerebrium ls sub_folder/
```
3. Remove files with `cerebrium rm`:
```bash theme={null}
# Remove a file
cerebrium rm file_name.txt
# Remove a directory
cerebrium rm folder_name
```
4. Download files with `cerebrium download`:
```bash theme={null}
# Download to current directory with same filename
cerebrium download file_name.txt
# Download with a different local filename
cerebrium download file_name.txt local_file_name.txt
# Download from a subdirectory
cerebrium download sub_folder/file_name.txt
```
## Using Stored Files
Access files in persistent storage at runtime:
```python theme={null}
import os
import torch
# Load a model from persistent storage.
file_path = "/persistent-storage/segment-anything/sam_vit_h_4b8939.pth"
model = torch.jit.load(file_path)
```
Applications access files using the full `/persistent-storage/` path at runtime:
```python theme={null}
# Read a file from persistent storage
with open("/persistent-storage/data/config.json", "r") as f:
config = json.load(f)
# Write to persistent storage
with open("/persistent-storage/data/results.json", "w") as f:
json.dump(results, f)
# Check if file exists in persistent storage
if os.path.exists("/persistent-storage/models/mymodel.pt"):
model = torch.load("/persistent-storage/models/mymodel.pt")
```
Remember that while the CLI commands don't display the `/persistent-storage/`
prefix in their output, your code must use the full path to access these files
at runtime.
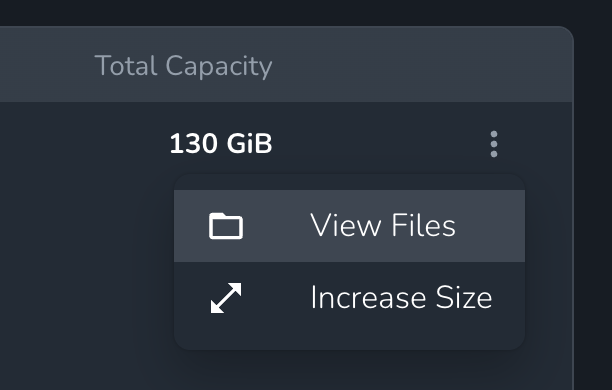
## Increasing Storage Capacity
The default 50GB persistent volume can be increased up to 1TB through self-service. The first 100GB is free, then \$0.05 per GB per month.
1. **Via Dashboard**: Navigate to the project and select **Volumes**. Click the three-dot menu on the volume and select **Increase Size**.
 2. **Via API**: Use the resize volume endpoint:
```bash theme={null}
curl -X POST "https://api.cerebrium.ai/v4/projects/{project_id}/volumes/{volume_id}/resize" \
-H "Authorization: Bearer YOUR_API_KEY" \
-H "Content-Type: application/json" \
-d '{"newSizeGb": 200}'
```
For storage needs beyond 1TB, contact support on
[Discord](https://discord.gg/ATj6USmeE2) or via
[email](mailto:support@cerebrium.ai).
### Storage Quota Errors
If you hit your storage quota, you'll see errors like `No space left on device` when trying to download or write files. To resolve this:
1. Remove unnecessary files from `/persistent-storage` using `cerebrium rm`
2. Resize the volume to a larger capacity (up to 1TB self-service)
3. Contact support for storage beyond 1TB
2. **Via API**: Use the resize volume endpoint:
```bash theme={null}
curl -X POST "https://api.cerebrium.ai/v4/projects/{project_id}/volumes/{volume_id}/resize" \
-H "Authorization: Bearer YOUR_API_KEY" \
-H "Content-Type: application/json" \
-d '{"newSizeGb": 200}'
```
For storage needs beyond 1TB, contact support on
[Discord](https://discord.gg/ATj6USmeE2) or via
[email](mailto:support@cerebrium.ai).
### Storage Quota Errors
If you hit your storage quota, you'll see errors like `No space left on device` when trying to download or write files. To resolve this:
1. Remove unnecessary files from `/persistent-storage` using `cerebrium rm`
2. Resize the volume to a larger capacity (up to 1TB self-service)
3. Contact support for storage beyond 1TB