> ## Documentation Index
> Fetch the complete documentation index at: https://cerebrium.ai/docs/llms.txt
> Use this file to discover all available pages before exploring further.
# Defining Container Images
## Introduction
Cerebrium abstracts infrastructure management into configuration, so teams focus on app code. A single TOML file manages environment setup, deployments, and scaling — tasks that typically require dedicated teams.
Unlike traditional Docker or Kubernetes setups with multiple configuration files and orchestration rules, Cerebrium uses a single `cerebrium.toml` file. The system handles container lifecycle, networking, and scaling automatically based on this configuration.
## Why TOML?
Python decorators scatter infrastructure settings throughout code files, making changes risky and reviews difficult. TOML centralizes configuration in one place, making it easier to track changes and maintain consistency. Its hierarchical structure maps naturally to app requirements without the accidental complexity of code-based configuration.
### Getting Started
Run `cerebrium init` to create a `cerebrium.toml` file in the project root. Edit it to match the app's requirements.
It is possible to initialize an existing project by adding a `cerebrium.toml`
file to the root of your codebase, defining your entrypoint (`main.py` if
using the default runtime, or adding an entrypoint to the .toml file if using
a custom runtime) and including the necessary files in the `deployment`
section of your `cerebrium.toml` file.
## Hardware Configuration
Configure GPU type and memory allocations in the hardware section:
```toml theme={null}
[cerebrium.hardware]
compute = "AMPERE_A10" # GPU selection
memory = 16.0 # Memory allocation in GB
cpu = 4 # Number of CPU cores
gpu_count = 1 # Number of GPUs
```
For detailed hardware specifications see the [toml reference](/toml-reference/toml-reference#hardware-configuration).
## Dependency management
### Selecting a Python Version
The Python runtime version forms the foundation of every Cerebrium app. Supported versions: 3.10 to 3.13. Specify the version in the deployment section:
```toml theme={null}
[cerebrium.deployment]
python_version = 3.11
```
The Python version affects the entire dependency chain. For instance, some packages may not support newer Python versions immediately after release.
To use a later Python version, please use a [Dockerfile](http://localhost:3000/container-images/custom-dockerfiles)
Changes to the Python version trigger a full rebuild since they affect both
the base environment and all Python package installations.
### Adding Python Packages
Manage Python dependencies directly in TOML or through requirement files:
```toml theme={null}
[cerebrium.dependencies.pip]
torch = "==2.0.0"
transformers = "==4.30.0"
numpy = "latest"
```
Or using an existing requirements file:
```toml theme={null}
[cerebrium.dependencies.paths]
pip = "requirements.txt"
```
For GitHub repositories, use shell commands instead of pip dependencies to
ensure proper versioning.
Cerebrium caches pip packages at the node level - including wheel files and compiled binaries - so subsequent builds only install new or updated packages. This significantly reduces build times.
### Adding APT Packages
System-level packages (image-processing libraries, audio codecs, etc.) are declared under `[cerebrium.dependencies.apt]`:
```toml theme={null}
[cerebrium.dependencies.apt]
ffmpeg = "latest"
libopenblas-base = "latest"
libomp-dev = "latest"
```
Alternatively, reference a text file listing system dependencies:
```toml theme={null}
[cerebrium.dependencies.paths]
apt = "deps_folder/pkglist.txt"
```
Changes to APT packages trigger a full rebuild of the container image, so builds take longer than when modifying Python packages alone.
### Conda Packages
Conda excels at managing complex system-level Python dependencies, particularly for GPU support and scientific computing:
```toml theme={null}
[cerebrium.dependencies.conda]
cuda = ">=11.7"
cudatoolkit = "11.7"
opencv = "latest"
```
Alternatively, reference a conda environment file:
```toml theme={null}
[cerebrium.dependencies.paths]
conda = "conda_pkglist.txt"
```
Like APT packages, Conda packages modify system-level components. Changes trigger a full rebuild. Batch Conda dependency updates together to minimize rebuild time.
## Build Commands
The build process includes two command types that execute at different stages during container image creation.
### Pre-build Commands
Pre-build commands execute at the start of the build process, before dependency installation. Use them to set up the build environment:
```toml theme={null}
[cerebrium.deployment]
pre_build_commands = [
# Add specialized build tools
"curl -o /usr/local/bin/pget -L 'https://github.com/replicate/pget/releases/download/v0.6.2/pget_linux_x86_64'",
"chmod +x /usr/local/bin/pget"
]
```
Common uses: installing build tools, configuring system settings, or preparing the environment for subsequent build steps.
### Shell Commands
Shell commands execute after all dependencies install and the application code copies into the container. This later timing ensures access to the complete environment:
```toml theme={null}
[cerebrium.deployment]
shell_commands = [
# Initialize application resources
"python -m download_models",
"python -m compile_assets",
"python -m init_app"
]
```
Use shell commands for tasks that require the fully configured environment — such as compiling code that depends on installed libraries or downloading resources.
## Custom Docker Base Images
The base image determines the OS foundation for the container. The default Debian slim image works for most Python apps; other validated base images support specific requirements.
### Supported Base Images
Supported base image categories include NVIDIA, Ubuntu, and Python images.
```toml theme={null}
[cerebrium.deployment]
docker_base_image_url = "debian:bookworm-slim" # Default minimal image
#docker_base_image_url = "nvidia/cuda:12.0.1-runtime-ubuntu22.04" # CUDA-enabled images
#docker_base_image_url = "ubuntu:22.04" # debian images
```
Starting with a minimal Debian or Ubuntu base image is recommended, as CUDA
images include many pre-installed components that increase container size.
While the relationship isn't strictly linear, larger container sizes generally
lead to longer cold-starts and build times. Begin with a lean base image and
add only essential components as needed.
#### Public Docker Hub Images with Namespaces
Public Docker Hub images with a namespace (e.g., `bob/infinity`, `huggingface/transformers`) require a local Docker Hub login, even though the image is public. Cerebrium reads `~/.docker/config.json` to authenticate image pulls.
```bash theme={null}
# Login to Docker Hub with username (required for namespace/image format)
docker login -u your-dockerhub-username
# Enter your password or access token when prompted
```
After logging in, you can use the image in your configuration:
```toml theme={null}
[cerebrium.deployment]
docker_base_image_url = "bob/infinity:latest"
```
Official Docker Hub images without a namespace (like `python:3.11`,
`debian:bookworm`, `ubuntu:22.04`) work without requiring a Docker login. Only
images in the `namespace/image` format require authentication.
Use `docker login -u username` instead of just `docker login`. The latter may
use Docker's web-based OAuth flow which creates tokens that are incompatible
with our build system.
#### Public AWS ECR Images
Public ECR images from the `public.ecr.aws` registry work without authentication:
```toml theme={null}
[cerebrium.deployment]
docker_base_image_url = "public.ecr.aws/lambda/python:3.11"
```
However, **private ECR images** require authentication. See [Using Private Docker Registries](/container-images/private-docker-registry) for setup instructions.
## Custom Runtimes
Cerebrium's default runtime covers most apps. Custom runtimes provide more control, enabling features like custom authentication, dynamic batching, public endpoints, or WebSocket connections.
### Basic Configuration
Define a custom runtime by adding the `cerebrium.runtime.custom` section to the configuration:
```toml theme={null}
[cerebrium.runtime.custom]
entrypoint = ["uvicorn", "main:app", "--host", "0.0.0.0", "--port", "8080"]
port = 8080
healthcheck_endpoint = "" # Empty string uses TCP health check
readycheck_endpoint = "" # Empty string uses TCP health check
```
Key parameters:
* `entrypoint`: Command to start the app (string or string list)
* `port`: Port the app listens on
* `healthcheck_endpoint`: The endpoint used to confirm instance health. If unspecified, defaults to a TCP ping on the configured port. If the health check registers a non-200 response, it will be considered *unhealthy*, and be restarted should it not recover timely.
* `readycheck_endpoint`: The endpoint used to confirm if the instance is ready to receive. If unspecified, defaults to a TCP ping on the configured port. If the ready check registers a non-200 response, it will not be a viable target for request routing.
Check out [this
example](https://github.com/CerebriumAI/examples/tree/master/11-python-apps/1-asgi-fastapi-server)
for a detailed implementation of a FastAPI server that uses a custom runtime.
### Self-Contained Servers
Custom runtimes also support apps with built-in servers. For example, deploying a VLLM server requires no Python code:
```toml theme={null}
[cerebrium.runtime.custom]
entrypoint = "vllm serve meta-llama/Meta-Llama-3-8B-Instruct --host 0.0.0.0 --port 8000 --device cuda"
port = 8000
healthcheck_endpoint = "/health"
healthcheck_endpoint = "/ready"
[cerebrium.dependencies.pip]
torch = "latest"
vllm = "latest"
```
### Important Notes
* Code is mounted in `/cortex` - adjust paths accordingly.
* The port in your entrypoint must match the `port` parameter.
* Install any required server packages (uvicorn, gunicorn, etc.) via pip dependencies.
* All endpoints will be available at `https://api.cerebrium.ai/v4/p-xxxxxxxx/{app-name}/your/endpoint`.
Deploy with `cerebrium deploy -y` - the system automatically detects custom runtime configuration.
## Deployment process
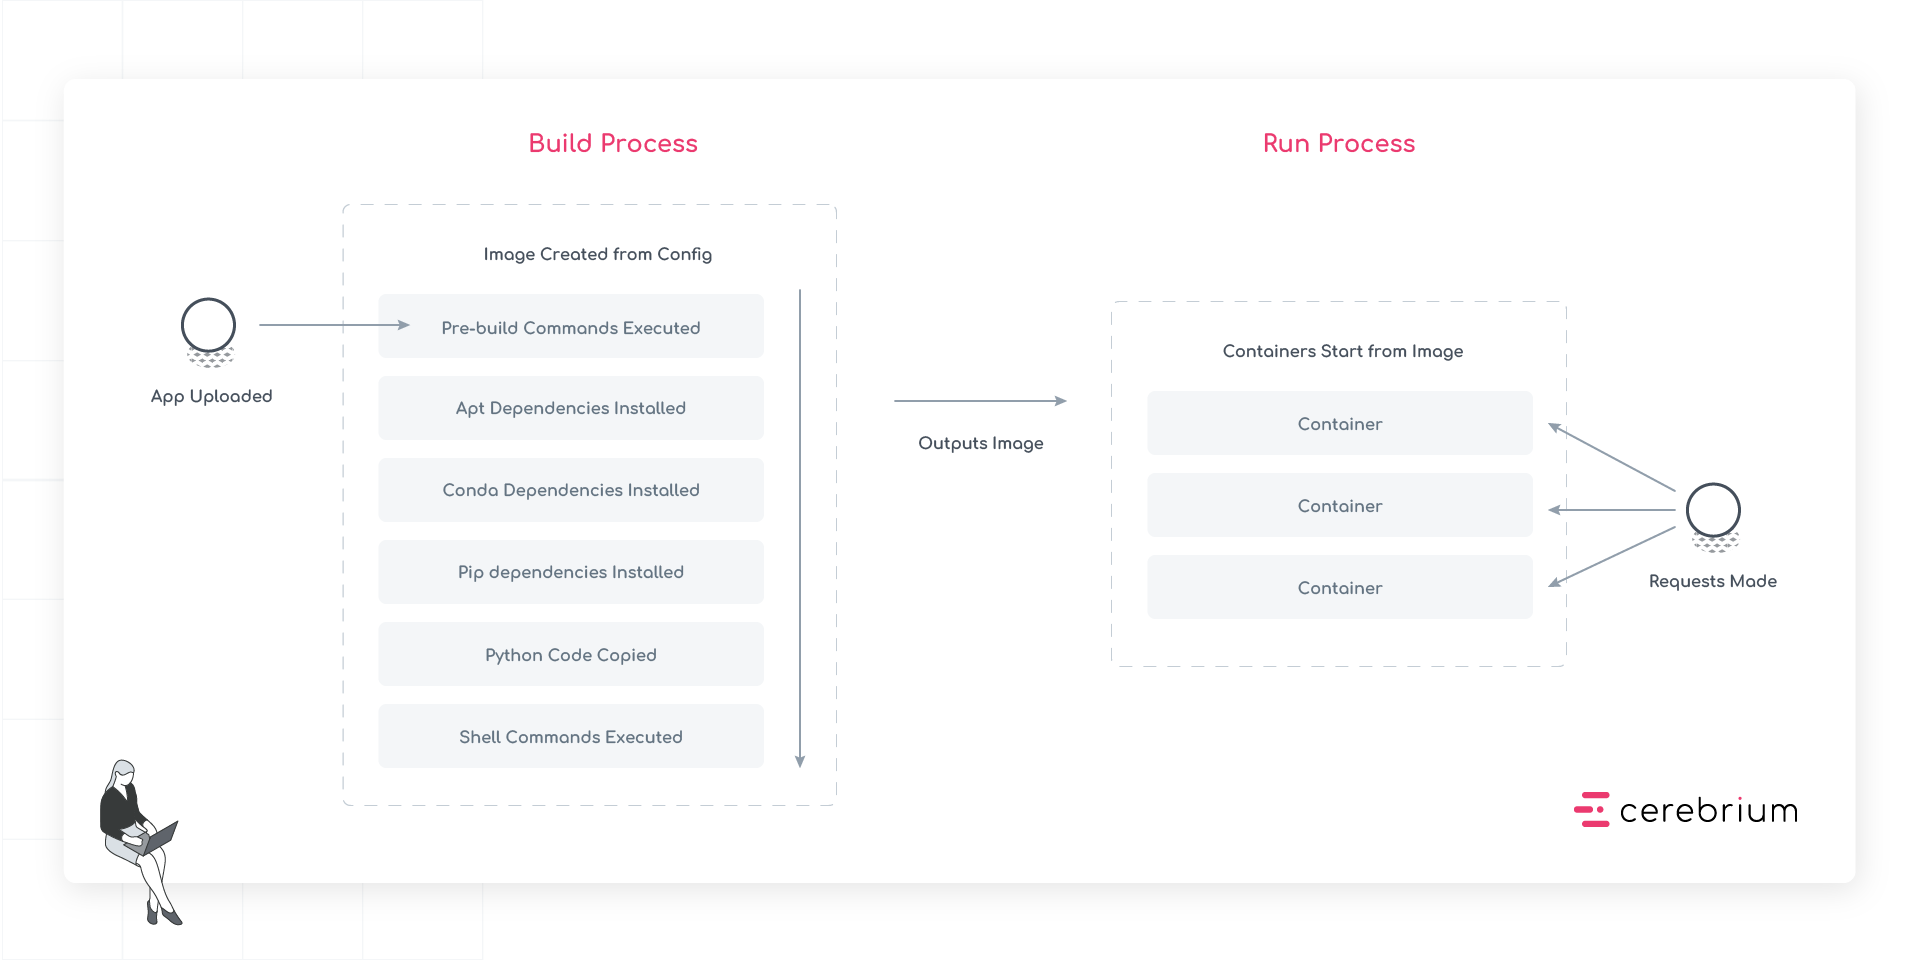 The build process follows a sequence that transforms source code into a production-ready container image:
### Stage 1: App Upload
Code is uploaded to Cerebrium, including all source files, configuration, and additional assets needed for the app.
### Stage 2: Image Creation
The system creates a container image through the following sequential steps:
1. **Pre-build Commands Execute**: First, any pre-build commands run. These set up the build environment and compile necessary assets before the main installation steps begin.
2. **APT Dependencies Install**: System-level packages install next, establishing the foundation for all other dependencies.
3. **Conda Dependencies Install**: After APT packages are in place, Conda packages install.
4. **Pip Dependencies Install**: Python packages install last, ensuring they have access to all necessary system libraries and binaries.
5. **Python Code Copy**: The app's source code copies into the container, placing it in the correct directory structure.
6. **Shell Commands Execute**: Finally, any build-time shell commands run to complete the image setup.
### Stage 3: Production Image
The result is a production-ready container image that contains everything needed to run the app. This image serves as a blueprint for creating individual containers when the app receives requests.
The build process follows a sequence that transforms source code into a production-ready container image:
### Stage 1: App Upload
Code is uploaded to Cerebrium, including all source files, configuration, and additional assets needed for the app.
### Stage 2: Image Creation
The system creates a container image through the following sequential steps:
1. **Pre-build Commands Execute**: First, any pre-build commands run. These set up the build environment and compile necessary assets before the main installation steps begin.
2. **APT Dependencies Install**: System-level packages install next, establishing the foundation for all other dependencies.
3. **Conda Dependencies Install**: After APT packages are in place, Conda packages install.
4. **Pip Dependencies Install**: Python packages install last, ensuring they have access to all necessary system libraries and binaries.
5. **Python Code Copy**: The app's source code copies into the container, placing it in the correct directory structure.
6. **Shell Commands Execute**: Finally, any build-time shell commands run to complete the image setup.
### Stage 3: Production Image
The result is a production-ready container image that contains everything needed to run the app. This image serves as a blueprint for creating individual containers when the app receives requests.